Boo-tiful Hairstyles for Halloween

20230215_P+C_StyleChatIcons-GraySM

Fun Styles

Spooky season is quickly approaching! A costume isn’t complete without a boo-tiful hair do. Here are some hairstyles that will take Halloween to the next level.

Find a Boo-tiful New 'Do! Text Bubble

Creepy Crawly Spider Bun

What you’ll need:

  • Hair elastics
  • Bobby pins
  • Pipe cleaners (preferably black)
  • Pom pom balls
  • Googly eyes
  • Construction paper
  • Hot Glue (or other strong adhesive)
Spider Bun Supplies

What you’ll need:

  • Hair elastics
  • Bobby pins
  • Pipe cleaners (preferably black)
  • Pom pom balls
  • Googly eyes
  • Construction paper
  • Hot Glue (or other strong adhesive)
Spider Bun Supplies
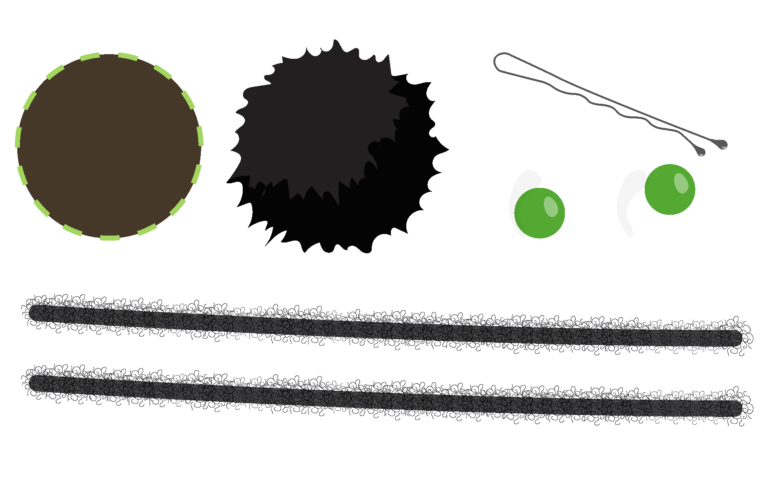
  1. Create the Spider’s Face Cut the construction paper in a circle about the same size as the pom pom. Then, slip the construction paper into the bobby pin. To create the spider’s face, glue the pom pom onto the construction paper on the bobby pin. Once that’s secure, glue the googly eyes onto the pom pom. NOTE: This can be done in advance. This can also serve as a quick and fun craft to do with your child!

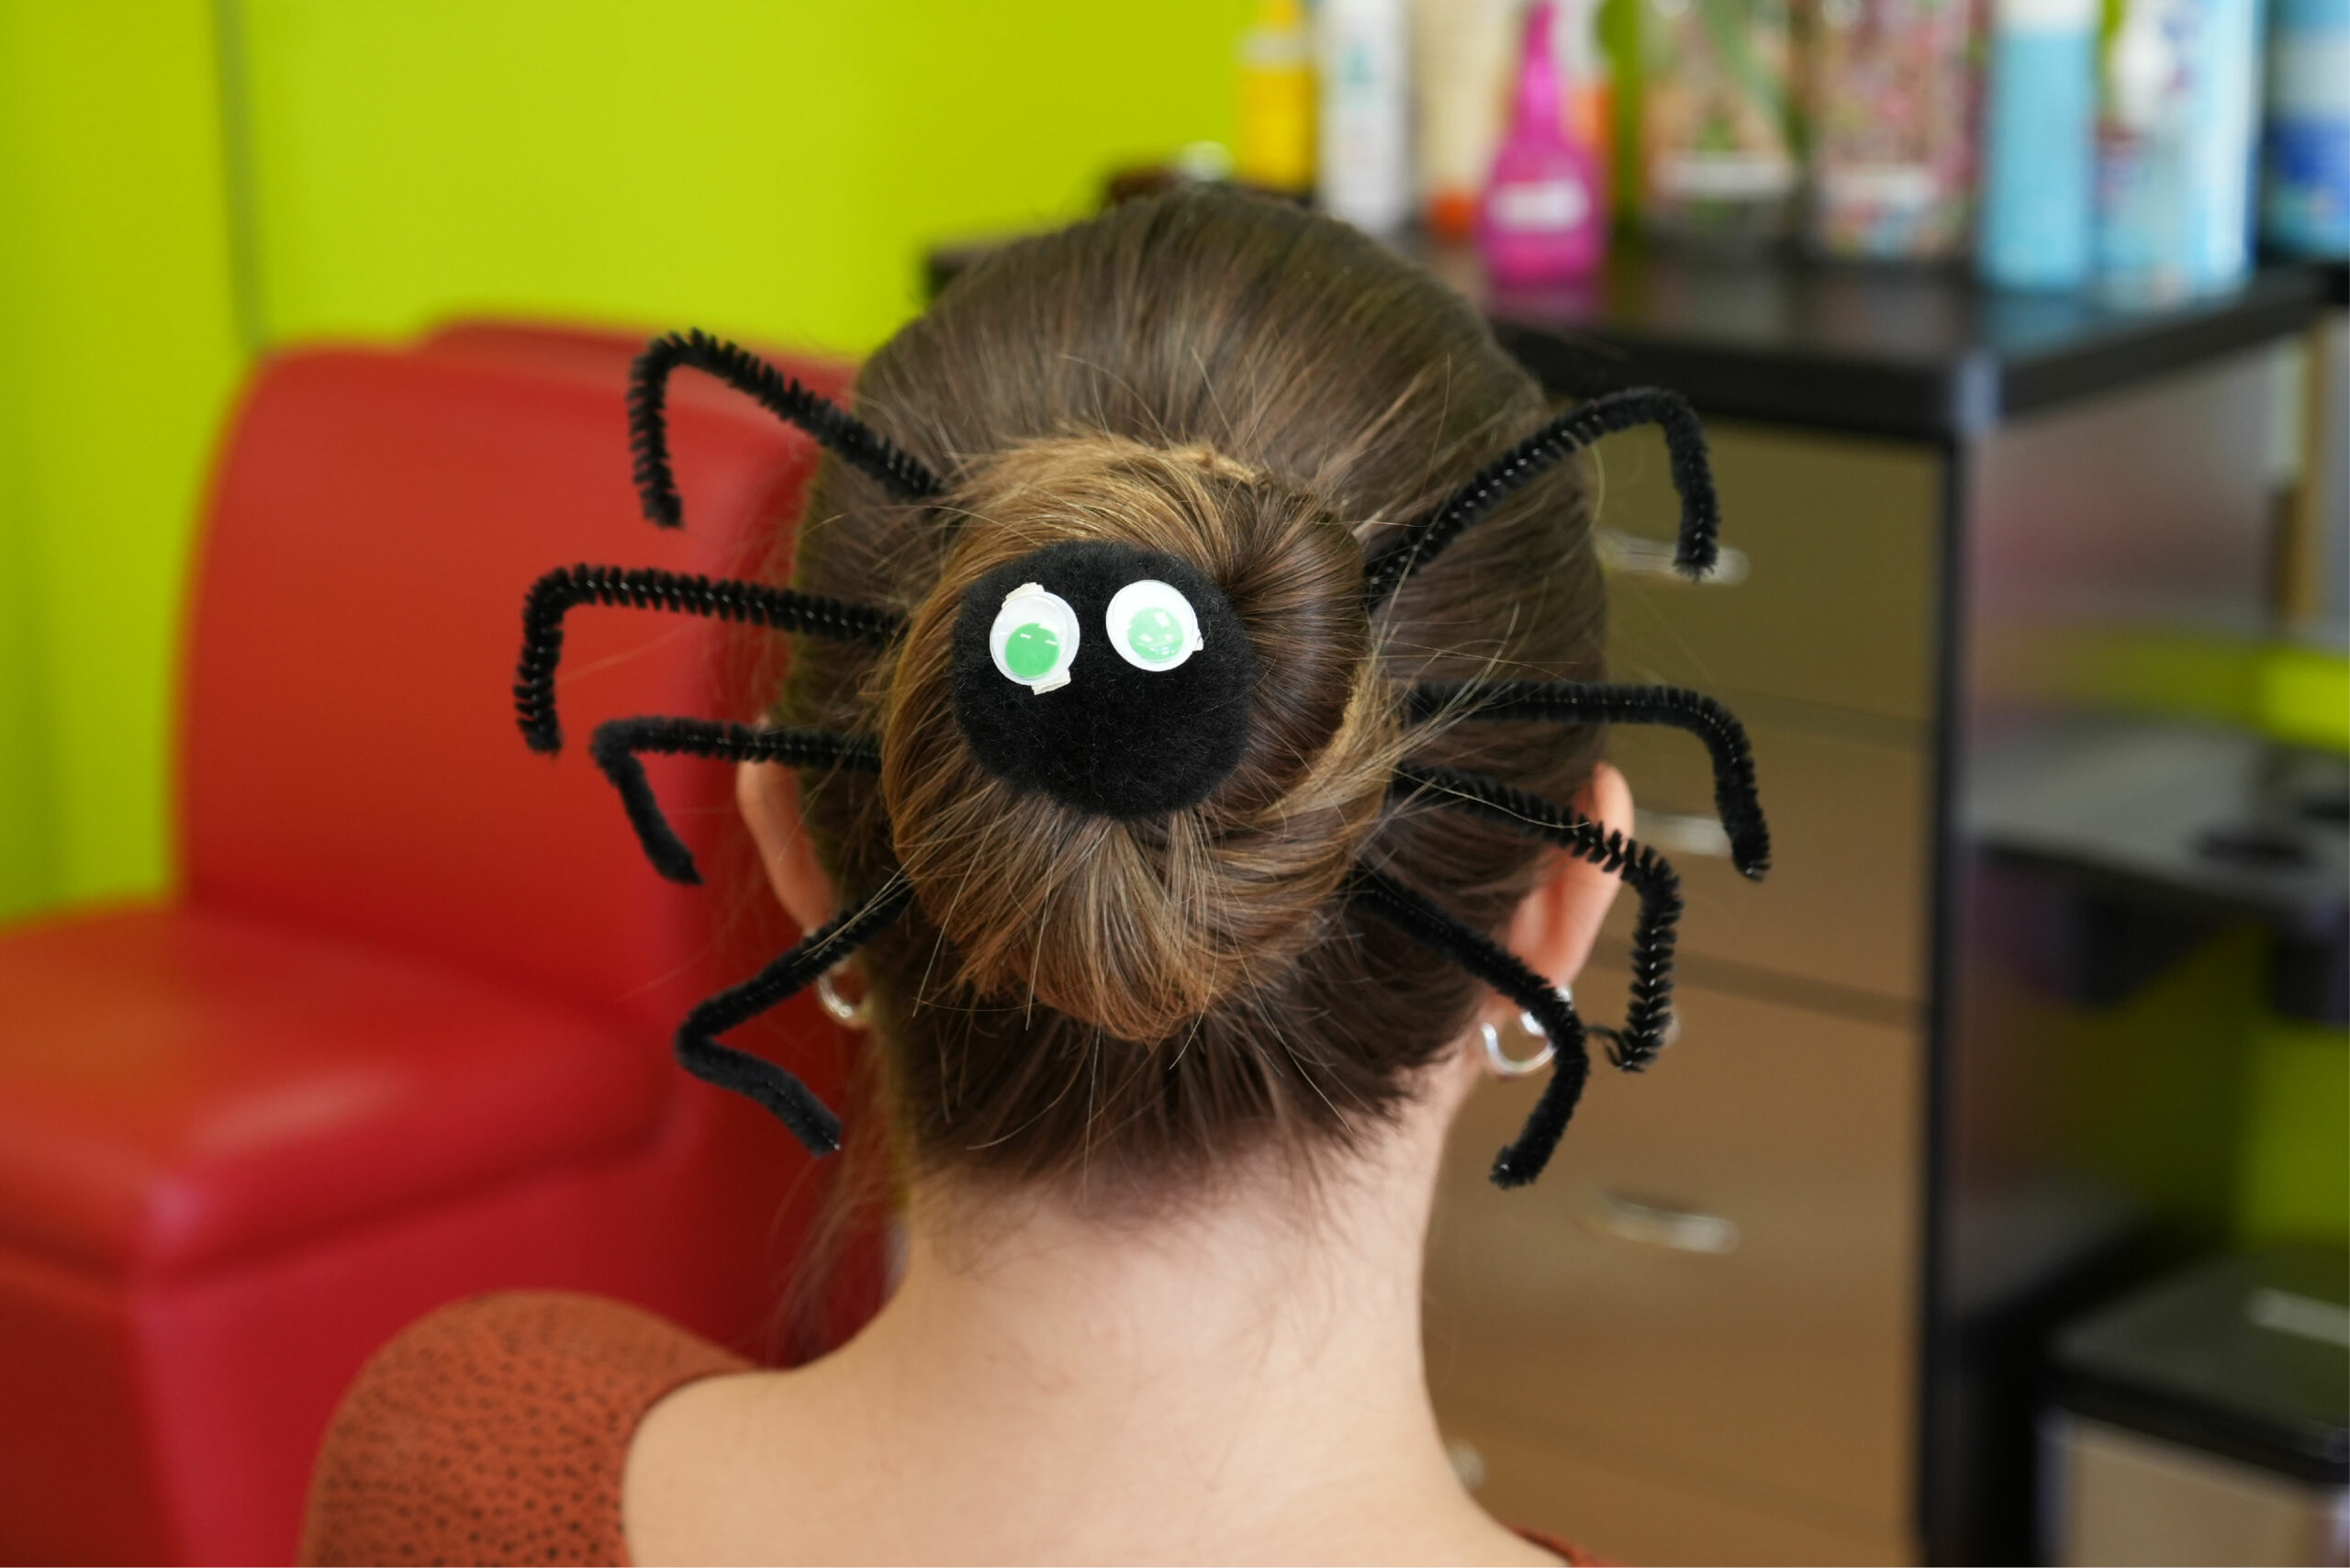
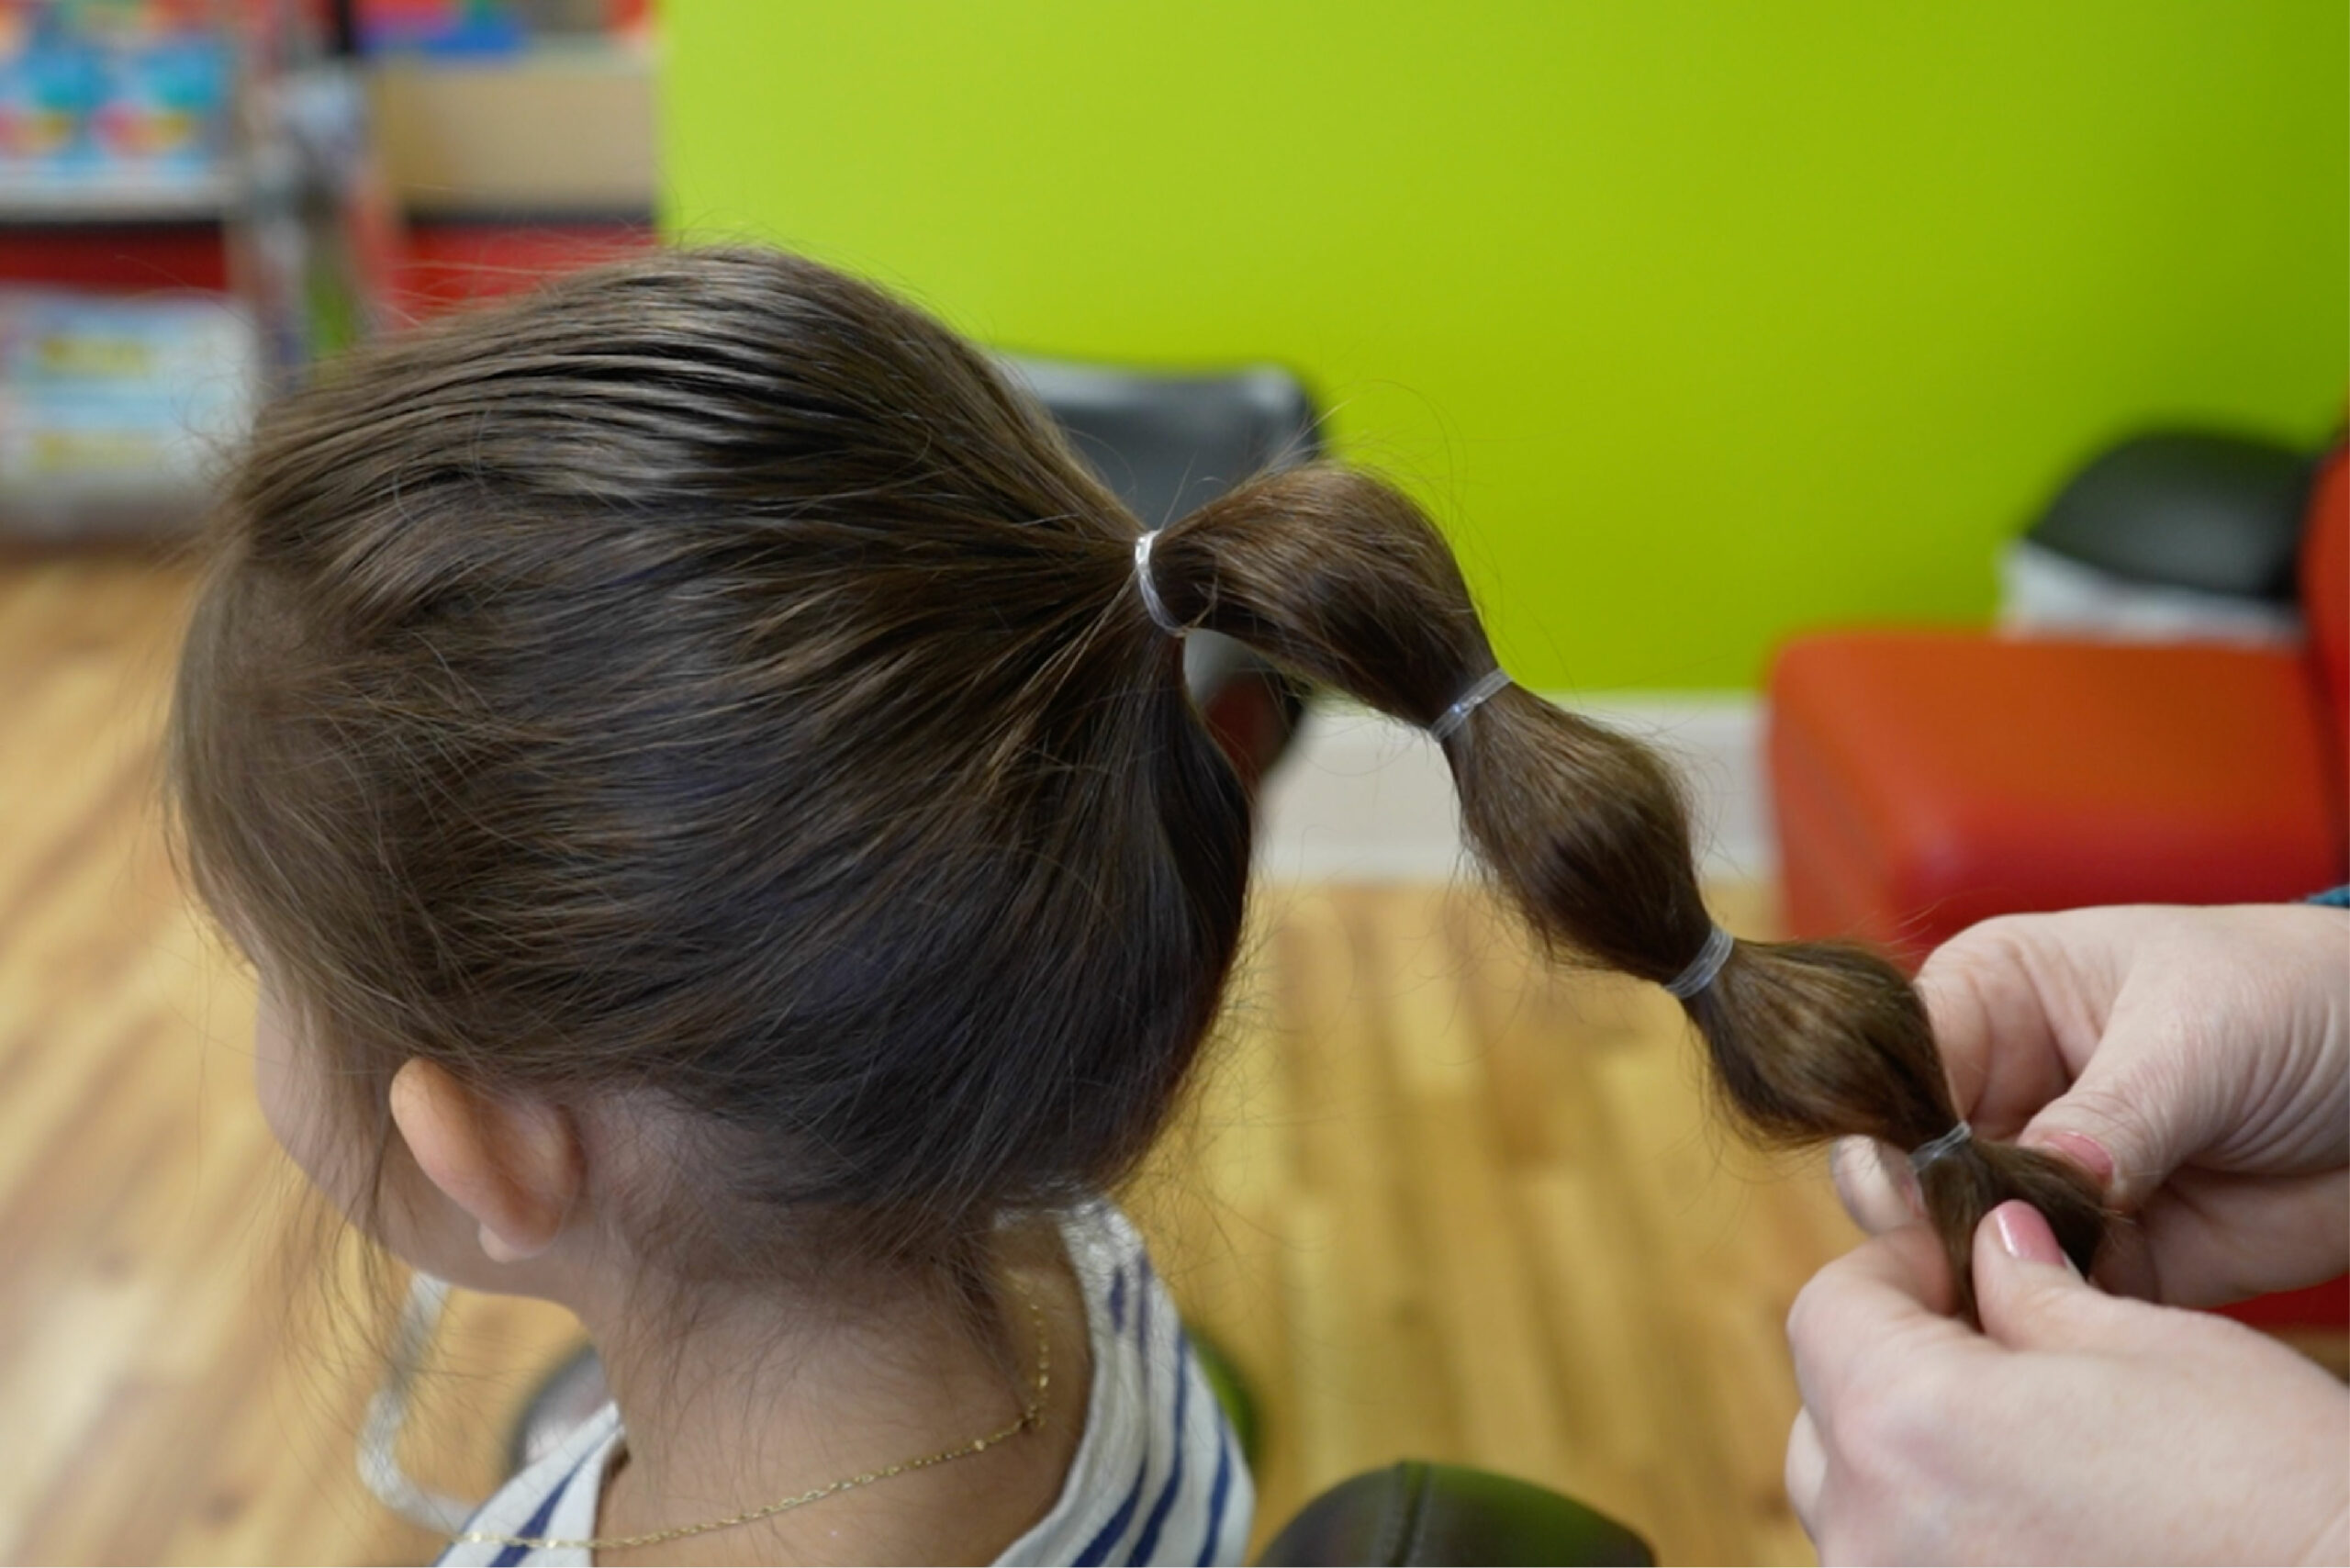
  2. Create the Body Pull your child’s hair back into a ponytail and secure it with a hair tie. Then take the ponytail and twist it and wrap it around the base to create a bun. Secure the bun with bobby pins to keep it in place.

  3. Create the Legs Use 4 pipe cleaners to cut in half to create the spider’s legs.

  4. It’s Alive! Secure the bobby pin with the spider’s face into the center of the bun. Then take the pipe cleaners and place four on each side by sticking them directly into the bun. For the final touch, bend the ends of the pipe cleaners to create small feet.

    Finish off with hairspray to tame any frizz or flyaways!

Magical Minnie Mouse Space Buns

What you’ll need:

  • Hair elastics
  • Bobby pins
  • A bow
  • Optional: Black temporary hair spray color
  1. Create Pigtails Part your child’s hair evenly down the middle. Then take each section and create high pigtails on each side and secure them with a hair elastic.

  2. Step 2: Create Space Buns Once your pigtails are secure, take the hair elastic and pull the hair partially through one last time. This should leave you with a fan shaped bun. Repeat this step on the other side. NOTE: If your child has longer hair, split the extra hair into two sections. Then, take the hair and tuck it into the opening of the fan on each side.

  3. Fan Out the Buns Take your fan shaped bun and spread it out until each side touches the pigtail base. Once it’s spread out and smoothed to your liking, secure it at the base of the pigtail with bobby pins. Repeat this on the other side.
    Once both sides are secured, spray with hairspray to hold the style and tame any frizz or flyaways. NOTE: If your child has lighter hair and you want more of a Minnie Mouse ears effect, consider adding temporary black hair spray color to the buns!

  4. Hot dog! You’re Minnie Mouse!
    To finish off the look, add your favorite bow onto one (or both) of the buns to complete your Minnie Mouse transformation!
Minnie Mouse Space Buns Tutorial

Purr-fect Braided Cat Ears

What you’ll need:

  • Hair elastics
  • 4 long Black pipe cleaners
  1. Section off the Ears Have your child’s hair parted in the middle. Then, section off two small square sections at the top of your child’s head on either side of the middle part. Secure each section with a hair elastic.

  2. Braid Your Sections Twist two of your pipe cleaners together. Once these are twisted, section one of the ponytails into two strands. Add the twisted pipe cleaners as the third strand and begin to do a 3-strand braid with the hair with the pipe cleaners. Secure the end of the braid with a hair elastic. Repeat on the other side.

  3. Create the Ears Take your finished braid and bend it into a point to resemble a cat ear. Take the end of the braid and bend it flat against your child’s scalp. Now you have the cat ear shape! Repeat on the other side.

  4. Purr-fect Ears Take any remaining hair or pipe cleaner and wrap it around the base of the ponytail where the hair elastic is. This will secure the ears. Finish off with any hairspray to tame any flyaways or frizz and you’re done!

    Incorporate these hairstyles this fall, and you’ll be looking absolutely fab-boo-lous! Need any extra tips? Ask your stylist during your next appointment at Pigtails & Crewcuts. Contact your local salon today to schedule your next appointment!
Braided Cat Ears Tutorial

Minecraft Creeper Hair

What you’ll need:

  • Green temporary hair spray color
  • Construction paper
  • Scissors
  • Painter’s Tape
  1. Create the Stencil Cut out two identical squares from your construction paper to represent the eyes. Then cut another piece of paper in the shape of the mouth.

  2. Place the face! Take each of your stencils and place tape on one side of each of the stencils. Carefully tape the stencils into the appropriate positioning onto the back of your child’s head.

  3. Spray away Once you are happy with the placement of the stencil, spray away! Spray your child’s whole head with the green temporary hair spray color. Then, carefully remove the stencil to reveal the Creeper hair!
Minecraft Creeper Hair Tutorial

Hedgehog Hairdo

What you’ll need:

  • Gel
  • Black & Brown face paint
  • Optional: Brown temporary hair spray color
  1. Spike it Up! Take your gel and spike your child’s hair up. This will be the hedgehog’s body.

  2. Finish your Furry Friend Take your brown face paint and draw out a rounded triangle shape beginning at your child’s hairline. Then take your black face paint and add the details! Outline the triangle then add eyes, a nose and whiskers. Finally, draw two legs near your child’s temples beginning at the hairline and you’re done!